Sunday, 20 May 2012

Evaluation!


I have thoroughly enjoyed this project. I feel like I have learnt new skills and processes that will help me in my future. I am also happy I got to make these three garments and feel that this will benefit me in industry.  I really enjoyed making each garment and learning how to make each one. I feel that although I got behind when making the shirt that I now manage my time better. I know what I have to do and how long I had to do it, which was shown by the fact that I finished the breeches on time while also working on the shirt.

 A major thing I have learned is to think a few steps ahead; thinking about the next few steps would prevent any mistakes I might make. Also taking the time to study an existing garment helped in figuring out the process of the garments, especially when it came to the breeches and the blouse as I had done it before. When it came to making the blouse I had little help from my tutor but because of the things I had learned enabled me to get on with it and make decisions on the way it is made. I had a major hiccup on the shirt where I hadn’t starched the fabric before doing the pleats but because I re did them properly I saw the difference and the reason why it needs to be starched.  So I learned from this mistake and also the fact that it is worth re doing something to feel happier about it so I can now look at the shirt and actually feel pleased about it.  Another important thing I learned was quality control. I was always looking and checking my stitch lines and if need be re do some, also when it came to the breeches and blouse I felt more confident in checking my own work and figuring if something did need to be re done instead of always asking my tutor.  Also checking if things lined up and matched for example the points on the collars matched or the jiggers on the breeches I felt I could analyse them to get them right. I think this will definitely help in any future costumes I make as I will be able to analyse and be critical about my own practical work.

I felt glad to be a part of Breathe because it is such a good project but, I didn’t really enjoy it. I felt like this because of how much time we had on it. I didn’t feel like we had enough time to do lots of samples as we spent a couple weeks on this and then got straight into creating the costume. I know that I wanted to improve my textiles skills which is why I was put into the elders group,  but then when it came to it I wasn’t sure of what I was doing or wanted to do. I think this was also due to the fact that at the beginning of the week we working on the costume store and then suddenly have to change to doing breathe and then back to the costume store at the end of the week. These are two different projects that are opposite and need different focuses. In the costume store I needed to focus on being really precise and neat whereas in breathe it was totally creative but suddenly changing to each project was hard.  

I also felt that because I originally chose the costume store that I wanted to put most of my energy and focus on that as I wanted to improve on my sewing skills. I think this was also because of the trousers I made for battle of the winds, they were very textured and I also had to keep working into them which is why I wanted to carry on with the textiles. In saying this when I started on the sleeves and layering the scraps of fabric on top of each other I started to like what I was doing which led me to create the knotted yarns and fabric. So once I opened up to it I created something I was pleased with. Also working on breathe improved my people skills and working in a team, as I usually prefer working on something by myself. But in a situation like this is was good to bounce ideas of each other which allowed us to create something better.

I feel privileged to have worked on both projects, but feel like I have learned more from the costume store and at the end of the day I feel happy about all my work.  

Saturday, 19 May 2012

Breeches

I didn't have that much trouble with the breeches and i managed to finish them in time for starting the blouse. I had a little problem near the beginning as i stitched the yolks on to far up, but didn't realize until i got a bit further but luckily when i unpicked them it didn't affect anywhere else.

I think that because i made trousers for Battle for the winds it made them more approachable than the shirt as that was my first shirt as well.

The main thing i have learnt from the breeches are the process and order of the way they are put together, especially learning how to make the front flap panel and the jiggers, with getting them to a point and to where they both match. I feel that i would be more confident next time i make a pair as i will know what to do.

Blouse Instructions.

Here are some basic instructions for the blouse.


  • After cutting out put all the darts in.

  • Pleat all the organza before cutting out the pattern, making sure the collar has been cut out. I needed to measure out all the pleats, each pleat are 2cm with a 1.5cm gap. so i measured 5.5cm and tacked that line, this will be the center point of the pleat.

  • Cut out the pattern pieces of the pleats, place them on the front and machine stitch them to the front of the blouse. Cut down the seam allowance to a few mm then zig-zag stitch along the edge,securing it so it doesn't fray. 

  • Hand stitch the lace on with a small running stitch.

  • The next thing to do is the button stand, for this some of the button stand will be in the organza. sew it on with right sides together and press, cut down the seam allowance. Fold over then fold under the seam allowance so its in the same place as it is on the front. Top stitch down and top stitch the center front edge.

  • Sew the side seams together, press and over lock and do the same for the shoulder seams. 

  • Sleeves:

  • Prepare the collar by sewing along the sides and top edges, turn the right way and press. With the right sides together pin and sew the collar on the marked lines, bring the other side of the collar to the inside of the blouse, fold the seam under, pin in place and top stitch down. top stitch around the rest of the collar. 

  • the last thing is buttons and button holes.

Friday, 18 May 2012

photos!

just thought id put some pics up of my breathe costume. I feel happy about this now, i still need to work into it but i'm pleased with it so far.


Starting the blouse.

I feel the more confident approaching the blouse than i did for the other garments. I feel that i can keep referring to the sample blouse if i have any questions. i also feel like i'm more critical about my work, i can look at a stitch line and think its looks straight and neat or know if it needs re doing. All throughout this project i have developed this as a practitioner.

Tuesday, 15 May 2012

finished shirt!

I finally finished the shirt (apart from buttons and button holes) the shirt took forever to do and felt like it was never going to end but in the end it was worth it as it doesn't look to bad for my first shirt. Here are some pics,


although it has taken so long to do i feel proud of my shirt especially with it being the first shirt i have made. I am most happy with the pleats, i found that re doing them was worth it as they look a lot neater and even. because we had so many problems it was hard going and made some parts of the shirt disproportional especially the collar as we had to draft the pattern out again. i feel like the collar is the least neat part of the whole thing, i found i had to fiddle around with it to get it right on the marked lines. 

Monday, 14 May 2012

Time management!

Even though i didn't manage to finish the shirt on time i feel like i am more aware of my time management and feel that as a practitioner my time management is getting better, keeping to deadlines.

Fitting for once upon a tease!


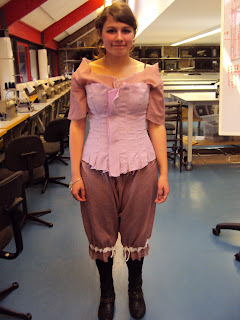
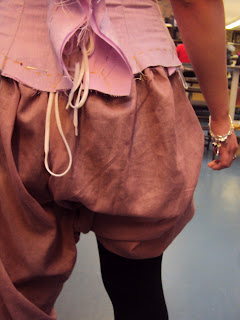
The fitting went well for all of us, the corset i'm making fit very well and i only have to take a little bit in at the bottom of the seams at the front.


So now its onto the alterations!

Friday, 11 May 2012

Getting there.

I feel like i'm actually getting somewhere with breathe now, i started working into the fringing on the trousers and working into the sleeves. sewing scraps of fabric, netting, string and barnacles into them, i'm happy with what it's looking like. Here are some pics.


After having a tutorial with my tutor I am now only doing the elders design which i feel better about instead of jumping form one group to another and means i can solely focus on that one costume and work more into it.

Sunday, 6 May 2012

Set for Streetcar!

Half way through the project we had a production meeting with the tutors and had to produce a white card model of the set, here are some photos.


I had to make some changes but here is the final thing.


A streetcar named desire!

During first year we did both making and design projects, the main design project we did we had to design and create a set for it alongside four costume designs for the main characters. we were put into groups and were given a different text that we had to work on. Mine was A streetcar named desire. Even though i chose to focus on making i wanted to put this on as it was the first proper model i had made.

Here is one of the initial design idea i had for the character Blanche.


Once upon a tease!

At the moment i am working with a group of students in my year to create costumes for a burlesque dance group, here is a link to their website for more information www.onceuponatease.com

Here is the design that i am going to create.


All of the designs were designed by Yolanda Collins.

I will be making the corset as another student will be creating the bustles.

We have only just cut out our fabric, so will post photos later in its different stages.

http://www.creative-textiles.co.uk/picts/imagegallery/falling%20waters.jpg
http://www.creative-textiles.co.uk/gallery.htm

http://www.textilearts.net/tutors/rosemariesmith/index.php

Breeches Instructions.

I am writing basic instructions for the breeches i made just as a reminder if in the future i would need them.


  • After flat tacking the leg pieces together, cut down the middle line at the top of the fronts, and cut down to the length of the yolk.

  • Prepare the yolk by sewing together with the right sides together, the top and center front lines and bag it out, then press.

  • Sew the yolks to the trousers, only through the top fabric of the yolk, and make sure they are put on the right side. press, then slip stitch the raw edge of the lining.

  • Sew the  crotch together, press the seam open and over lock the edges separately.  

  • for the lining of the flap, sew both pieces together, press and cut down the seams. sew the hem by double turning it, the sew it to the flap on the top edge.


  • Now attach the jiggers (make sure they are tacked and both triangle match) sew it onto the flap along the tacked line. make the triangle and tack it so it stays that shape.


  • To turn it to the other side, cut into the jigger in the middle but only so far that the other half goes round the back and lies flat.

  • Slip stitch the triangle down following up the side to where it goes around the back, and also slip stitch   the back of the jigger to the yolk.  


  • Its now time to do the bigger pocket, follow the western pocket instructions (i will upload onto here)

  • Then sew the seams together, starting with the inside leg, outside leg then the crotch (do not sew along all the way to the top of the center back, leave a bit for the waistband,) making sure that after each seam to over lock and press.

  • Fold over the wide part of the seam at the bottom of the leg for the button placement line and herringbone stitch them down. 

  • Knee band: sew the triangle part of it together and again get them to match. Sew the knee band to the hem line, cut down and press the seam. fold it inside to hide the raw edge and slip stitch it down.  

  • Waistband: firstly do the pocket like the welt pocket. once the pocket is done, sew the waistband to the lining along the center front and the top edge, making sure on the inside (once turned to the right way) at the top the top fabric is showing about 3/4cm, trim the seam and turn the right way and press. 

  • Pin and sew the top fabric of the waistband to the waistline of the breeches, again trim and press the seam allowance. Turn the lining over and slip stitch it down.

  • Sew the rest of the crotch up, press and over lock.

  • Then whats left to do is button holes and buttons.

Saturday, 5 May 2012

Moulin rouge costume

This photographs is of the finished costume after the dress parade with the accessories that was chosen to go with it for the film.


These are the photographs that were taken.


Moulin Rouge!

Our last project (VNC) in first year was Moulin Rouge. We were given designs by Frances Tempest, she designed 10 Moulin Rouge dancers and we were put into groups of 7 and had to create the costume using our own interpretation. we had to make a corset and a onesie. Me and my classmates all modeled for each other and when we finished making the costume we had professional photographs done and we had a film made.

Here is the design i was given.

For this project we immediately cut out in top fabric, so we only had one fitting, the first three photographs are before the fitting and the others are after the fitting.